Paper Toys: Architecture to print and build

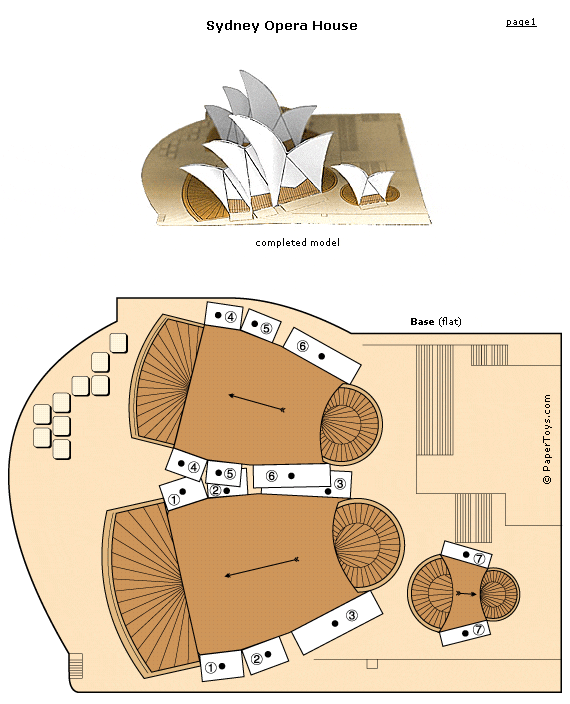
What it is:  At Anastasis Academy we have several kids who are absolutely crazy for architecture.  Not only can they emphatically tell you that they want to be an architect when they grow up, they collect architecture Lego models, will tell you how they wish they could go back in history to meet Frank Lloyd Wright and will build and draw models any chance they get.  These are elementary students!  Today when I came across these Paper Toy models of famous architecture, I knew I would have to share with our students and, while I was at it, would share with all of you who may have your own budding architects!

On Paper Toys you can find and print paper models for:

How to integrate Paper Toys Architecture Models into the classroom: In addition to instantly reaching hero status among your architecture crowd, the Paper Toys Architecture Models is a great addition to the math, history and art classroom.   Students can put the models together digging into the different architecture styles, mathematical models represented by the architecture, and the history of the architecture.  Students can print and build the models (a great exercise in patience, perseverance and attention to detail).  Next students can attach their finished model to a base where they can surround it with math, art or history details they learned about the building to the base.  If they really want to get creative, they can twirl and swirl the words around using different color markers to create an informative landscape.

Students can dig in further and map the various models on a Google map.  If several students are creating models, they can compare and contrast architecture from different time periods, different geographic regions and identify the origins of the type of architecture.

Tips:  Be sure to check out the other Paper Toy models. Your students can build cars, monuments and much more.  New models are added every month!

Please leave a comment and share how you are using Paper Toy Models in  your classroom!
Flake Pad: Create geometric, symmetrical shapes

What it is:  Flake Pad is a very simple little website that lets students create geometric snowflakes using basic shapes and a grid.  To make their flake, students choose a shape and click a spot on the grid.  Students can add as many or as few shapes as they would like to their flake. When they are done the flake can be viewed off of the grid for a screen shot that can be included in other projects or it can be printed off.  I like Flake Pad because it gives students space to be creative and can be used to teach and practice symmetry.

How to integrate Flake Pad into the classroom:  Flake Pad is a great little site to help students understand symmetry.  Any time students click a space on the grid, the shape is added to multiple points on the grid.  Use Flake Pad on an interactive whiteboard or projector-connected computer where students can identify lines of symmetry on the flake that the whole class can see. With the pointer tool on Flake Pad, students can drag the shapes they have created to different points.  Have students in the audience describe what happens to the flake as the shapes are moved.  Do the lines of symmetry change?

Flake Pad can be used on classroom computers as a center activity.  Students can create their own flake, print the flake out and draw the various lines of symmetry with a ruler.

Use Flake Pad during a unit on weather.  Students can experiment with creating their own snow flake, print the flake out and use the print out to list characteristics of snow, or snow related vocabulary along any straight lines on their flake.

Tips: Flake Pad works from the Safari browser on an iPad….mostly. The line shape doesn’t work.  Students could still create their own flakes, print and add lines with a pencil…further practicing their understanding of symmetry!

Please leave a comment and share how you are using Flake Pad in  your classroom!

Learning Box Base 10 Blocks: Virtual math manipulative

What it is:  Today while I was doing a quick Google search for a place I could buy a set of base 10 blocks, I came across this AWESOME digital version by accident.  What a happy accident!  Learning Box has a virtual version of base 10 blocks that builds in a fun practice game.  Students are given a target number and drag base 10 blocks onto the paper to represent that number.  As students add blocks, a counter at the bottom of the page shows how many blocks are currently on the paper.  This is a great way for students to digitally practice place value, counting by hundreds, tens and ones.

The outcome of my shopping trip for base 10 blocks: the digital version is MUCH cheaper (read:free) than the physical version (not free).  While I understand the value of the physical blocks, the digital version is a fantastic alternative for classrooms without the budget for each student to have a set or for students to continue practice at home.

How to integrate Learning Box Base 10 into the classroom:  The Learning Box Base 10 blocks are a great example of a virtual manipulative.  They help students visually represent numbers and place value.  I like the way the slider and cups on the bottom of the page help track student progress as they drag blocks to the paper. When students get the target number, they don’t start with a blank slate, instead a new target number is given and students have to figure out which blocks to add or subtract. You can adjust the level of difficulty and place values practiced by clicking on the 1, 10, and 100 circle to the left of the paper.

Learning Box Base 10 would make a great center activity in the one or two computer classroom.  Students can use the digital manipulatives with the built in game or to help them represent real-world problems.

Start a whole-class game with the Learning Box Base 10 blocks using a projector-connected computer or interactive whiteboard.  Students can take turns at the board solving the problem and “phone a friend” if they need some additional support.

Tips: This Learning Box activity is flash based…I’m hoping that someone comes out with an app of manipulatives for the iPad (hint, hint).

Please leave a comment and share how you are using Learning Box Base 10 Blocks in  your classroom!

Class Connect

What it is:  Class Connect offers teachers a students everything they need to work in one place.  Class Connect brings social networking to the classroom, it can do everything from giving you a place to manage your files in the cloud to building a full online learning community.  Files can be easily shared with a drag/drop interface.  All of your files can be shared with multiple classes without having to reload them.  Teachers can create and deliver interactive lectures, starting from scratch or importing existing PowerPoint files.  All content can be dragged and dropped.  Mini quizzes can be added for presentations that require something of students.  Class Connect also enables you to build up community within your classroom by posting messages for the class, receiving student feedback and encouraging student-to-student collaboration securely.  The interface for Class Connect is intuitive and easy to master with built-in video tutorials that guide you through.  The learning curve here is small!

How to integrate Class Connect into the classroom:  Class Connect gives your students a virtual environment for sharing and collaborating.  Extend the walls of your classroom by making documents readily and easily available to students.  Post assignments, reminders, “wonders” (statements/questions to make your students wonder) and class announcements.  Allow your students to work together and collaborate on projects in a secure environment where they can safely learn to use and manage their online communication.  Create “live lectures” where your students can continue their learning, or catch up on learning. This is great for kids who have missed days-or months- due to illness or travel.

Older students will appreciate the calendar that allows them to set up reminders as texts to their mobile phone.

Tips: Those of you who use Google Docs at school will love this feature: full integration of Google Docs! Woo hoo!  Attendance and gradebook integration are on the way…stay tuned!

Please leave a comment and share how you are using Class Connect in  your classroom!

Lessons learned from Stanford, Google, IDEO and Pixar

This weekend I spent some time with incredible innovators at Stanford University to talk about innovation in education.  All walks of life gathered at d.school to discuss problems in education and to propose solutions.

My biggest takeaway: Education needs more design thinking and collaborative concepting at all levels.

Throughout the day we shared stories, created concept maps, brainstormed collaboratively, identified problems in education and prototyped possible solutions.  I love that we didn’t just give answers. We prototyped possible solutions in the prototype lab where we had access to all kinds of great building materials.  We came up with some pretty impressive solutions.  What if schools operated more like this?  If teachers and students worked together as designers.  This is the drive behind Anastasis Academy’s morning inquiry block.  We look at big questions and work on interdisciplinary projects that incorporate a range of subjects and disciplines of learning.

“What if the process of education were as intentionally crafted as the products of education (i.e., we always think about the book report or the final project, but not the path to get there).” (Fast Company)

Schools have a lot to learn from Google, IDEO and Pixar.  These are companies that have created a culture of creativity, play and collaboration.  IDEO mirrors this culture in their physical space.  The space lends itself to creativity and new ideas because the space isn’t overly prescriptive.  Stanford’s d.school was very similar.  Tracks run all over the building where walls of whiteboards can be clipped in and moved around easily.  A writing space wherever and whenever you need one.  Brilliant.  All of the furniture is on wheels, it is easily moved and rearranged based on current needs.  Large wooden Lego-type blocks can be easily moved, arranged and built with for any situation.

I love the philosophies of Pixar, the layout is designed to foster “forced collisions of people”.  Students with different backgrounds, passions and understandings collided in new understandings.  Would forced collisions of people encourage a whole new population of da Vinci thinking?

At Google play is not only encouraged, it is deeply engrained in the culture.  Spaces are flexible and constantly changing and being built.  This is was the case in Stanford’s d.school and I have to say, the instant ability to edit our workspace impacted our thinking.  “Imagine what might happen if students had this same power to edit and make their own spaces within the school environment.” (Fast Company)

I highly recommend the following article from Fast Company “What Schools Can Learn From Google, IDEO, and Pixar.”

The article mentions High Tech High, a collection of charter schools in Southern California led by Larry Rosenstock.  Please take the 14 minutes to watch this great video about High Tech High!  Innovation is education is emerging in pockets all over the world. Anastasis Academy is a part of this innovation!


Children’s Books Forever


What it is:   Children’s Books Forever is a simple site that packs a powerful punch for instilling a love of reading at an early age.  These are free children’s books that have become classics and children’s favorite books from around the world.  The books can be used on an interactive whiteboard, power point, overhead projector, on iPads (or other iDevices), or classroom computers.  Did I mention they are free?  These fun picture books are downloadable in pdf format and are wonderful for expanding your classroom library.  New books are being added regularly to Children’s Books Forever so be sure to check back often!

How to integrate Children’s Books Forever into the classroom:  I love sites that spread a love for reading while simultaneously beefing up the classroom library (and student’s home libraries).  The site is simple to use, just choose a book, download as a PDF and read.  Couldn’t be any simpler!  The books can be read in multiple languages making it a wonderful place for students who are learning a second language or speaking English as a second language.  Be sure to click on the links in the left side bar, they will lead you to additional books.  Find books for toddlers, Waldo humor books, inspirational books and more information on author Hans Wihelm in addition to the books featured on the home page.

The stories featured on Children’s Books Forever are beautifully written and illustrated.  Do your students have a pen pal or buddy in another country who speaks a different language?  Why not find a book that is featured in both languages to read and discuss together?  This is a great connecting point for students!

Bookmark Children’s Books Forever on classroom computers so that students can easily access the books during reading time.  The books can also be printed and added to the class library.  Be sure to remind your students they can access these stories from any Internet connected computer, they can keep reading at home too.

Many of the stories on Children’s Books Forever can be used for character education discussions in the primary classroom.  Project these stories on an interactive whiteboard or projector-connected computer for a class read along.

Tips: Be sure to sign up to be notified when new books are added to Children’s Books Forever via email!

Please leave a comment and share how you are using Children’s Books Forever in  your classroom!


Make your own iPad Stylus for less than 10 cents!

We had an incredible first week at Anastasis Academy.  It was amazing to see all of our hard work come together in the form of a student body.  Walking through the classrooms this week it was obvious: this is a place of learning.

One of our first-week of school activities was creating our own iPad stylus.  Since we are a one-to-one iPad environment, this seemed like a good beginning for everyone.

We learned that to make a stylus, we first had to find some soft, conductive material.  A Google search informed us that we could use conductive foam (the kind that is used to pack electronics), conductive thread, conductive yarn (we thought this would be PERFECT for our pens but couldn’t get any delivered fast enough), or a Scotch Brite sponge.  I was a little skeptical of the Scotch Brite (it just seemed TOO easy) but it worked like a champ!

The kids had fun exploring how the yellow, soft part of the sponge would draw on the iPad when they held it in their hands.  Some of the kiddos were a little baffled when they put the sponge into the plastic pen body and they found out that it no longer worked.  Students added a little wire and soon the pens were working again!  It was a great way for all of the kids to experiment with conductors and insulators.

Below are the steps for making your very own $0.10 or less iPad stylus.

*I bought a pack of Scotch Brite sponges, cheap, penny pens from a local office store, and a small roll of craft wire.  We made about 50 pens for $6.00!

1.  Separate the Scotch Brite sponge from the abrasive green backing.  Cut the yellow sponge remaining into small wedges.

2.  Take the ink out of some cheap plastic pen casing.  Drill a hole near the head of the pen with a small drill bit.

3.  Cut 6 inches of wire.

4. Tightly wrap the wire around the small end of the sponge wedge.

5. Thread the sponge through the head of the pen (our pen head separated from the pen body).

6. Bend the end of the wire farthest from the sponge into a 90* angle.  Thread this into the pen body and through the pre-drilled hole.

7.  Pull the wire through the drilled hole and wrap it several times around the pen body.

8.  Cut the exposed end of the sponge into desired pen-nub shape. 

9.  To use the pen, make sure that your hand is touching the wire at some point. Draw or write with your stylus!

The kids loved making their own stylus.  There was a lot of talk about perseverance (when we tried to thread the wire through the small drilled hole), conductivity and exclamations of “I did it!”.

It was a wonderful exercise in frustration and success.  Every student was proud of their finished product that actually worked!  Students learned about conductivity, perseverance, insulation, and building with every-day materials.

One of our students, Benton, made a short stop motion animation with his pen…you can see it below:


Now for our next trick- working with @ianchia to figure out how we can construct conductive manipulatives that work with the iPad.  Should be fun!

A New Year of #Project PLN!!

A new year of Project PLN is here!  Over the summer we (read: @thenerdyteacher) spiffed up the look of Project PLN and gave it it’s very own home.  You can now find a new Issue of Project PLN each month at http://projectpln.com.   I am LOVING the new look and feel this year!  Project PLN looks like a bookshelf and each post contributed by the PLN is a separate item on the shelf.  So cool.

Nick and I started Project PLN last year as a way to get to know the members of our PLN better and to connect and spread ideas.  Many of you have contributed over the past year and I hope that you will continue to contribute this year!  We have some fun topics coming up that I think will spur some great thinking.

We are dubbing the October issue”The Best” issue. We want people to share something that they think is the very best. It could be a lesson plan they really love, it could be a mobile app, it could be a web tool or anything else that you think is the very best and you want to share it with the rest of the PLN.

In November, we are having a #SchoolDidAGoodThing issue. We want people to share the stories of how school did a good thing for them. These stories serve as an inspiration to teachers and the community. It is a nice reminder why we all do what we do. We really hope you will share a story with us on how school did a good thing.

December is going to be EPIC. We have an idea for the December issue that we really love. We have declared December, “The Student Voice Issue”. We want to encourage teachers to have students write about, film, draw, etc. what they want their dream school to look like. Our goal is to have 13 posts with 1 post representing each grade of K-12. We still have some logistics to work out, but we want to get the idea out there now so interested teachers can think about working with their students on this exciting project.

We hope you like this month’s issue of ProjectPLN and we want to hear from you about what we can do to make it better.

As always, feel free to email posts to ProjectPLN10@Gmail.com, check in on us at Twitter @ProjectPLN or say hello on Facebook.

This month’s Project PLN was all about advice on starting the school year. We have a wide variety of advice from amazing educators from all over the world that might be what you are looking for or might be perfect for teachers in your building.

This month you can find the following:

  • Believing in Our Students
  • First Day of School Activities
  • Reflecting Back to Forge Ahead
  • I’m Ready
  • Back To School
  • Ready or Not
  • Personalizing Learning
  • Starting the New Year
  • Classroom Management Stuff for New Teachers

I am always humbled by all of you in my PLN, you are incredible!

Thank you to all who contributed to this issue and please join in by contributing to the next issue!


Make your own QR Code Scavenger Hunt!

Today was the first day of school.  Ever.  It was pretty epic.  Since the students didn’t know where things were located in the building yet, I thought we would have some fun locating them with a QR code scavenger hunt.  It was SO easy to do, I thought I would share the process here.

1.  First I made a new website where each page of the website contained a clue.  I made my site with Weebly.com because it is SO easy to use.  I made the entire site in under 10 minutes.

2. Next I used goo.gl URL shortener to shorten the URL of each webpage and generate a QR code.  Just copy and paste the long Weebly URL into the goo.gl shortener and voila. A short Googlefied (that is a technical term) URL.  Click on “Details” next to the shortened URL to view your QR code.  I just dragged and dropped these QR codes into a Pages document so that they were all in one place for easy printing/copying.

3.  Print out QR code sheet and make enough copies for each classroom.  Because we have a 10-1 student-teacher ratio, I made up 10 clues to find.  Each student was in charge of one clue.  I cut up the QR code sheet so that each student had a little QR code clue card.

4.  Set students out on their mission.  Each student takes a turn using the Scan app to uncover the clue.  They read the clue out loud to their group and brainstorm what the answer could be.  When they thought they had the answer, they went to that place and took a picture of it using the camera app.  For example, one of our clues was: “The Grub Hub”, students went down to the kitchen and took a picture.

5.  When all pictures have been collected, students gather and add up the points they won.

*Below is my example of the QR code and website they were connected to.

This was a really easy activity to prepare for from a teacher perspective.  The impact was huge with the students.  They had a great time with this!

We used this hunt as a way for students to familiarize themselves with the layout of the new school but it would also be a great activity for a math scavenger hunt “Find an item that represents three times four”, or colors in art “This is the color you get when you mix yellow and blue”, or literature “find an object that represents this character in our novel”.  The list could go on and on if you use your imagination!  The QR codes are so easy to generate, students could use these for almost anything!

First Day of School: Anastasis Academy #standagain

Today was one for the books.  We did it! We opened a school with a radical new vision for what a school should look like in light of learning.  It was a truly great day!

Of course there were some bumps (that is to be expected with ANY first day of school) but I have to say, when you surround yourself with incredible people it is hard to go wrong.  When I say that we built a dream team it is not an exaggeration.  These are true teachers, masters at what they do because each of them is a linchpin.  They don’t wait around for someone to tell them what to do, they exude greatness and encourage the same in their students.

We started our day the way we will start every day at Anastasis Academy, with a community mile walk.  We call this a community walk because families are invited to do it with us.  Every family joined us today.  I know that won’t be the case every day but it was an incredible start to the year to see a whole community walk together.

After the walk, the community gathered for a blessing for the year from our Board Members.  These are people who have poured into us and mentored us in so many ways.  We couldn’t be where we are without our board and the people it represents.

Today there were discussions about community, what it means to properly manage freedom and how to be a friend.  The children are incredibly perceptive and these discussions led to some pretty profound insights from the students.  One fourth grader noted “Freedom requires a lot of responsibility.”  Students seemed to grasp that freedom doesn’t mean that we get to do whatever we want when we want to.  It requires something of us.  There were discussions about what this freedom looks like within our school community, what this freedom looks like in learning and what this freedom looks like in our technology use with the iPads.

The iPads are still a novelty for many of the students.  They wanted to do EVERYTHING on the iPads all at once because they could.  “Let’s play a game, listen to music, and have a video going all at once!!”  I suspect that the novelty will wear off as students come to realize that the iPad isn’t just a once-in-a-while privileged but something that they can learn with all the time.  One of my favorite moments of the day was when some eighth grade boys came up from lunch having an argument about which was bigger: a liter or a gallon.  Their first instinct wasn’t to use their iPads and Google the answer, but to ask an adult.  They are still in the mindset that adults hold all of the knowledge of the world.   It was a great time for us to shrug our shoulders and remind them that they had the whole world at their fingertips and could discover the answer themselves.

We had some fun whole-school activities built into the day.  Before school each teacher wrote 10 things about themselves.  Each item was printed out on a separate piece of paper.  These were spread out on the floor and students were to choose an item and match it to the teacher they thought it belonged to.  Each teacher stood in a different corner and the students set off trying to match talents, passions and fears to the correct teacher.  After they had correctly placed all of the items, each teacher took a moment to go through their stack, introducing themselves to the students.  The kids asked great follow-up questions and were excited that many of their own passions, interests and fears were reflected in those leading them in learning this year.  It was so much fun to see students faces light up when teachers said things like “I love Star Wars” or “I love to play basketball”.  They begged for proof when we shared secret talents “touching our tongue to our nose”.  They shared a special bond when they found out that even adults have fears. (Mine is taxidermy-true story.)

Because we are in a brand new building, we had to come up with a way of helping kids find things like bathrooms, drinking fountains, classrooms, playgrounds, lunchroom, etc.  I thought a scavenger hunt would be a fun way to do this.  Since I am a HUGE geek, I decided to do this techy style with QR codes.  Each team (classroom) got 10 QR codes that led them to clues with each student in charge of one clue.  Students downloaded the free Scan app and scanned the QR codes to receive a clue.  As a team, they worked together to solve the clue to find different areas in the building.  When they solved the clue they took a picture of the answer using the camera app.  At the end of the hunt, students added up their points.  All ages had fun with the hunt!

I deemed the day a success when, at the end of the day, I overheard siblings use their iPad to FaceTime with their dad.  He asked how the first day was and both answered, “great! We had fun!”.  The first grader went on to enthusiastically tell her dad about the scavenger hunt that she went on and the pictures that she took.  The seventh grader added some additional details about how the QR codes worked.  Both talked about relationships with teachers and students.  To have that on the first day of a new school is telling.  We have a great team.

Passwords may have been missing, permissions needed to be configured but all in all it was a fantastic success!  I can’t wait to see what the year brings.

Onward.